Tuesday, March 18, 2014

Javascript - Browsers Compatibility

It is important to understand the differences between different browsers in order to handle each in the way it is expected. So it is important to know which browser your Web page is running in.
To get information about the browser your Web page is currently running in, use the built-in navigator object.

Navigator Properties:

There are several Navigator related properties that you can use in your Web page. The following is a list of the names and descriptions of each:
PropertyDescription
appCodeNameThis property is a string that contains the code name of the browser, Netscape for Netscape and Microsoft Internet Explorer for Internet Explorer.
appVersionThis property is a string that contains the version of the browser as well as other useful information such as its language and compatibility.
languageThis property contains the two-letter abbreviation for the language that is used by the browser. Netscape only.
mimTypes[]This property is an array that contains all MIME types supported by the client. Netscape only.
platform[]This property is a string that contains the platform for which the browser was compiled."Win32" for 32-bit Windows operating systems
plugins[]This property is an array containing all the plug-ins that have been installed on the client. Netscape only.
userAgent[]This property is a string that contains the code name and version of the browser. This value is sent to the originating server to identify the client

Navigator Methods:

There are several Navigator-specific methods. Here is a list of their names and descriptions:
MethodDescription
javaEnabled()This method determines if JavaScript is enabled in the client. If JavaScript is enabled, this method returns true; otherwise, it returns false.
plugings.refreshThis method makes newly installed plug-ins available and populates the plugins array with all new plug-in names. Netscape only.
preference(name,value)This method allows a signed script to get and set some Netscape preferences. If the second parameter is omitted, this method will return the value of the specified preference; otherwise, it sets the value. Netscape only.
taintEnabled()This method returns true if data tainting is enabled and false otherwise.

Browser Detection:

There is a simple JavaScript which can be used to find out the name of a browser and then accordingly an HTML page can be served to the user.
<html>
<head>
<title>Browser Detection Example</title>
</head>
<body>
<script type="text/javascript">
<!--
var userAgent   = navigator.userAgent;
var opera       = (userAgent.indexOf('Opera') != -1);
var ie          = (userAgent.indexOf('MSIE') != -1);
var gecko       = (userAgent.indexOf('Gecko') != -1);
var netscape    = (userAgent.indexOf('Mozilla') != -1);
var version     = navigator.appVersion;

if (opera){
  document.write("Opera based browser");
  // Keep your opera specific URL here.
}else if (gecko){
  document.write("Mozilla based browser");
  // Keep your gecko specific URL here.
}else if (ie){
  document.write("IE based browser");
  // Keep your IE specific URL here.
}else if (netscape){
  document.write("Netscape based browser");
  // Keep your Netscape specific URL here.
}else{
  document.write("Unknown browser");
}
// You can include version to along with any above condition.
document.write("<br /> Browser version info : " + version );
//-->
</script>
</body>
</html>

Javascript Image Map

You can use JavaScript to create client side image map. Client side image maps are enabled by the usemap attribute for the <img /> tag and defined by special <map> and <area> extension tags.
The image that is going to form the map is inserted into the page using the <img /> element as normal, except it carries an extra attribute called usemap. The value of the usemap attribute is the value of the name attribute on the <map> element, which you are about to meet, preceded by a pound or hash sign.
The <map> element actually creates the map for the image and usually follows directly after the <img /> element. It acts as a container for the <area /> elements that actually define the clickable hotspots. The <map> element carries only one attribute, the name attribute, which is the name that identifies the map. This is how the <img /> element knows which <map> element to use.
The <area> element specifies the shape and the coordinates that define the boundaries of each clickable hotspot.
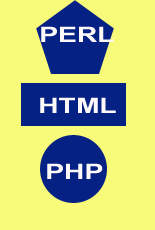
The following combines imagemaps and JavaScript to produce a message in a text box when the mouse is moved over different parts of an image.
<html>
<head>
<title>Using JavaScript Image Map</title>
<script type="text/javascript">
<!--
function showTutorial(name){
  document.myform.stage.value = name
}
//-->
</script>
</head>
<body>
<form name="myform">
   <input type="text" name="stage" size="20" />
</form>
<!-- Create  Mappings -->
<img src="/images/usemap.gif" alt="HTML Map" 
        border="0" usemap="#tutorials"/>

<map name="tutorials">
   <area shape="poly" 
            coords="74,0,113,29,98,72,52,72,38,27"
            href="/perl/index.htm" alt="Perl Tutorial"
            target="_self" 
            onMouseOver="showTutorial('perl')" 
            onMouseOut="showTutorial('')"/>

   <area shape="rect" 
            coords="22,83,126,125"
            href="/html/index.htm" alt="HTML Tutorial" 
            target="_self" 
            onMouseOver="showTutorial('html')" 
            onMouseOut="showTutorial('')"/>

   <area shape="circle" 
            coords="73,168,32"
            href="/php/index.htm" alt="PHP Tutorial"
         target="_self" 
            onMouseOver="showTutorial('php')" 
            onMouseOut="showTutorial('')"/>
</map>
</body>
</html>
This will produce following result. Move your mouse around and see the changes:
HTML Map Perl Tutorial HTML Tutorial PHP Tutorial

Javascript Debugging

There is a great chance that you would make a mistake while writing your programme. A mistake in a script is referred to as a bug.
The process of finding and fixing bugs is called debugging and is a normal part of the development process. This section covers tools and techniques that can help you with debugging tasks.

Error Messages in IE:

The most basic way to track down errors is by turning on error information in your browser. By default, Internet Explorer shows an error icon in the status bar when an error occurs on the page:
Error Icon
Double-clicking this icon takes you to a dialog box showing information about the specific error that occurred.
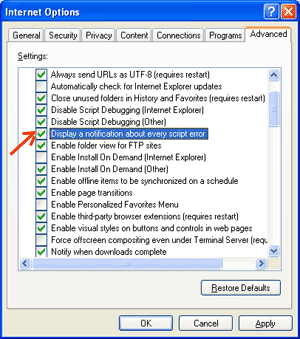
Because this icon is easy to overlook, Internet Explorer gives you the option to automatically show the Error dialog box whenever an error occurs.
To enable this option, select Tools --> Internet Options --> Advanced tab. and then finally check the Display a Notification About Every Script Error box option as shown below:
Internet Options

Error Messages in Firefox or Mozilla:

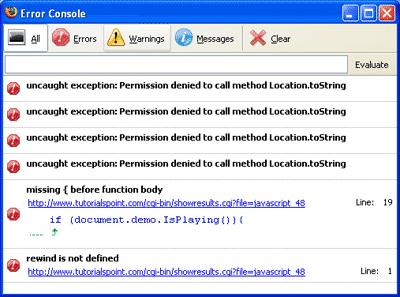
Other browsers like Firefox, Netscape and Mozilla send error messages to a special window called the JavaScript Console or Error Consol. To view the console, select Tools --> Error Consol or Web Development.
Unfortunately, since these browsers give no visual indication when an error occurs, you must keep the Console open and watch for errors as your script executes.
Error Console

Error Notifications:

Error notifications that show up on Console or through Internet Explorer dialog boxes are the result of both syntax and runtime errors. These error notification include the line number at which the error occurred.
If you are using Firefox then you can click on the error available in the error console to go to the exact line in the script having error.

How to debug a Script:

There are various ways to debug your JavaScript:

Use a JavaScript Validator:

One way to check your JavaScript code for strange bugs is to run it through a program that checks it to make sure it is valid.that it follows the official syntax rules of the language. These programs are called validating parsers, or just validators for short, and often come with commercial HTML and JavaScript editors.
The most convenient validator for JavaScript is Douglas Crockford's JavaScript Lint, which is available free online at Douglas Crockford's JavaScript Lint.
Simply visit that web page, paste your JavaScript (Only JavaScript) code into the text area provided, and click the jslint button. This program will parse through your JavaScript code, ensuring that any variable and function definitions follow the correct syntax. It will also check JavaScript statements, such as if and while, to ensure they too follow the correct format

Add Debugging Code to Your Programs:

You can use the alert() or document.write() methods in your program to debug your code. for example, you might write something like :
var debugging = true;
var whichImage = "widget";
if( debugging )
   alert( "Calls swapImage() with argument: " + whichImage );
var swapStatus = swapImage( whichImage );
if( debugging )
   alert( "Exits swapImage() with swapStatus=" + swapStatus );
By examining the content and order of the alert()s as they appear, you can examine the health of your program very easily.

Use a JavaScript Debugger:

A debugger is an application that places all aspects of script execution under the control of the programmer. Debuggers provide fine-grained control over the state of the script through an interface that allows you to examine and set values as well as control the flow of execution.
Once a script has been loaded into a debugger, it can be run one line at a time or instructed to halt at certain breakpoints. Once execution is halted, the programmer can examine the state of the script and its variables in order to determine if something is amiss. You can also watch variables for changes in their values.
The latest version of the Mozilla JavaScript Debugger (code-named Venkman) for both Mozilla and Netscape browsers can be downloaded at http://www.hacksrus.com/~ginda/venkman

Useful tips for developers:

There are few tips that you can use to reduce the number of errors in your scripts and that can make the debugging process a little easier.
  • Remember to use plenty of comments. Comments enable you to explain why you wrote the script the way you did and to explain particularly difficult sections of code.
  • Always use indentation to make your code easy to read. Indenting statements also makes it easier for you to match up beginning and ending tags, curly braces, and other HTML and script elements.
  • Write modular code. Whenever possible, group your statements into functions. Functions let you group related statements, and test and reuse portions of code with minimal effort.
  • Be consistent in the way you name variables and functions. Try using names that are long enough to be meaningful and that describe the contents of the variable or the purpose of the function.
  • Use consistent syntax when naming variables and functions. In other words, keep them all lowercase or all uppercase; if you prefer Camel-Back notation, use it consistently.
  • Test long scripts in a modular fashion. In other words, do not try to write the entire script before testing any portion of it. Write a piece and get it to work before adding the next portion of code.
  • Use descriptive variable and function names and avoid using single-character names.
  • Watch your quotation marks. Remember that quotation marks are used in pairs around strings and that both quotation marks must be of the same style (either single or double).
  • Watch your equal signs. You should not used a single = for comparison purpose.
  • Declare variables explicitly using the var keyword.

Javascript Multimedia

The JavaScript navigator object includes a child object called plugins. This object is an array, with one entry for each plug-in installed on the browser. The navigator.plugins object is supported only by Netscape, Firefox and Mozilla only.
Here is an example to list down all the plug-on installed with your browser:
<html>
<head>
<title>List of Plug-Ins</title>
</head>
<body>
<table border="1">
<tr>
    <th>Plug-in Name</th>
    <th>Filename</th>
    <th>Description</th>
</tr>
<script language="JavaScript" type="text/javascript">
for (i=0; i<navigator.plugins.length; i++) {
   document.write("<tr><td>");
   document.write(navigator.plugins[i].name);
   document.write("</td><td>");
   document.write(navigator.plugins[i].filename);
   document.write("</td><td>");
   document.write(navigator.plugins[i].description);
   document.write("</td></tr>");
}
</script>
</table>
</body>
</html>

Checking for Plug-Ins:

Each plug-in has an entry in the array. Each entry has the following properties:
  • name - is the name of the plug-in.
  • filename - is the executable file that was loaded to install the plug-in.
  • description - is a description of the plug-in, supplied by the developer.
  • mimeTypes - is an array with one entry for each MIME type supported by the plug-in.
You can use these properties in a script to find out about the installed plug-ins, and then using JavaScript you can play appropriate multimedia file as follows:
<html>
<head>
<title>Using Plug-Ins</title>
</head>
<body>
<script language="JavaScript" type="text/javascript">
media = navigator.mimeTypes["video/quicktime"];
if (media){
  document.write("<embed src='quick.mov' height=100 width=100>");
}
else{
  document.write("<img src='quick.gif' height=100 width=100>");
}
</script>
</body>
</html>
NOTE: Here we are using HTML <embed> tag to embed a multimedia file.

Controlling Multimedia:

Let us take one real example which works in almost all the browsers:
<html>
<head>
<title>Using Embeded Object</title>
<script type="text/javascript">
<!--
function play()
{
  if (!document.demo.IsPlaying()){
    document.demo.Play();
  }
}
function stop()
{
  if (document.demo.IsPlaying()){
    document.demo.StopPlay();
  }
}
function rewind()
{
  if (document.demo.IsPlaying()){
    document.demo.StopPlay();
  }
  document.demo.Rewind();
}
//-->
</script>
</head>
<body>
<embed id="demo" name="demo"
    src="http://www.amrood.com/games/kumite.swf"
    width="318" height="300" play="false" loop="false"
    pluginspage="http://www.macromedia.com/go/getflashplayer"
    swliveconnect="true">
</embed>
<form name="form" id="form" action="#" method="get">
<input type="button" value="Start" onclick="play();" />
<input type="button" value="Stop" onclick="stop();" />
<input type="button" value="Rewind" onclick="rewind();" />
</form>
</body>
</html>

Javascript Animation

You can use JavaScript to create a complex animation which includes but not limited to:
  • Fireworks
  • Fade Effect
  • Roll-in or Roll-out
  • Page-in or Page-out
  • Object movements
You might be interested in existing JavaScript based animation library : Script.Aculo.us.
This tutorial will give you basic understanding on how to use JavaScript to create an animation.
JavaScript can be used to move a number of DOM elements (<img />, <div> or any other HTML element) around the page according to some sort of pattern determined by a logical equation or function.
JavaScript provides following two functions to be frequently used in animation programs.
  • setTimeout( function, duration) - This function calls function after duration milliseconds from now.
  • setInterval(function, duration) - This function calls function after every duration milliseconds.
  • clearTimeout(setTimeout_variable) - This function calls clears any timer set by the setTimeout() functions.
JavaScript can also set a number of attributes of a DOM object including its position on the screen. You can set top and left attribute of an object to position it anywhere on the screen. Here is the simple syntax:
// Set distance from left edge of the screen.
object.style.left = distance in pixels or points; 

or
// Set distance from top edge of the screen.
object.style.top = distance in pixels or points; 

Manual Animation:

So let's implement one simple animation using DOM object properties and JavaScript functions as follows:
<html>
<head>
<title>JavaScript Animation</title>
<script type="text/javascript">
<!--
var imgObj = null;
function init(){
   imgObj = document.getElementById('myImage');
   imgObj.style.position= 'relative'; 
   imgObj.style.left = '0px'; 
}
function moveRight(){
   imgObj.style.left = parseInt(imgObj.style.left) + 10 + 'px';
}
window.onload =init;
//-->
</script>
</head>
<body>
<form>
<img id="myImage" src="/images/html.gif" />
<p>Click button below to move the image to right</p>
<input type="button" value="Click Me" onclick="moveRight();" />
</form>
</body>
</html>
Here is the explanation of the above example:
  • We are using JavaScript function getElementById() to get a DOM object and then assigning it to a global variable imgObj.
  • We have defined an initialization function init() to initialize imgObj where we have set its position and left attributes.
  • We are calling initialization function at the time of window load.
  • Finally, we are calling moveRight() function to increase left distance by 10 pixels. You could also set it to a negative value to move it to the left side.

Automated Animation:

In the above example we have seen , how an image moves to right with every click. We can automate this process by using JavaScript function setTimeout() as follows:
<html>
<head>
<title>JavaScript Animation</title>
<script type="text/javascript">
<!--
var imgObj = null;
var animate ;
function init(){
   imgObj = document.getElementById('myImage');
   imgObj.style.position= 'relative'; 
   imgObj.style.left = '0px'; 
}
function moveRight(){
   imgObj.style.left = parseInt(imgObj.style.left) + 10 + 'px';
   animate = setTimeout(moveRight,20); // call moveRight in 20msec
}
function stop(){
   clearTimeout(animate);
   imgObj.style.left = '0px'; 
}
window.onload =init;
//-->
</script>
</head>
<body>
<form>
<img id="myImage" src="/images/html.gif" />
<p>Click the buttons below to handle animation</p>
<input type="button" value="Start" onclick="moveRight();" />
<input type="button" value="Stop" onclick="stop();" />
</form>
</body>
</html>
Here we have add more spice. So let's see what is new here:
  • The moveRight() function is calling setTimeout() function to set the position of imgObj.
  • We have added a new function stop() to clear the timer set by setTimeout() function and to set the object at its initial position.

Rollover with a Mouse Event:

Here is a simple example showing image rollover with a mouse events:
<html>
<head>
<title>Rollover with a Mouse Events</title>
<script type="text/javascript">
<!--
if(document.images){
    var image1 = new Image();      // Preload an image
    image1.src = "/images/html.gif";
    var image2 = new Image();      // Preload second image
    image2.src = "/images/http.gif";
}
//-->
</script>
</head>
<body>
<p>Move your mouse over the image to see the result</p>
<a href="#" onMouseOver="document.myImage.src=image2.src;"
            onMouseOut="document.myImage.src=image1.src;">
<img name="myImage" src="/images/html.gif" />
</a>
</body>
</html>
Let's see what is different here:
  • At the time of loading this page, the if statement checks for the existence of the image object. If the image object is unavailable, this block will not be executed.
  • The Image() constructor creates and preloads a new image object called image1.
  • The src property is assigned the name of the external image file called /images/html.gif.
  • Similar way we have created image2 object and assigned /images/http.gif in this object.
  • The # (hash mark) disables the link so that the browser does not try to go to a URL when clicked. This link is an image.
  • The onMouseOver event handler is triggered when the user's mouse moves onto the link, and the onMouseOut event handler is triggered when the user's mouse moves away from the link (image).
  • When the mouse moves over the image, the HTTP image changes from the first image to the second one. When the mouse is moved away from the image, the original image is displayed.
  • When the mouse is moved away from the link, the initial image html.gif will reappear on the screen.

JavaScript - Form Validation

Form validation used to occur at the server, after the client had entered all necessary data and then pressed the Submit button. If some of the data that had been entered by the client had been in the wrong form or was simply missing, the server would have to send all the data back to the client and request that the form be resubmitted with correct information. This was really a lengthy process and over burdening server.
JavaScript, provides a way to validate form's data on the client's computer before sending it to the web server. Form validation generally performs two functions.
  • Basic Validation - First of all, the form must be checked to make sure data was entered into each form field that required it. This would need just loop through each field in the form and check for data.
  • Data Format Validation - Secondly, the data that is entered must be checked for correct form and value. This would need to put more logic to test correctness of data.
We will take an example to understand the process of validation. Here is the simple form to proceed :
<html>
<head>
<title>Form Validation</title>
<script type="text/javascript">
<!--
// Form validation code will come here.
//-->
</script>
</head>
<body>
 <form action="/cgi-bin/test.cgi" name="myForm"  
          onsubmit="return(validate());">
 <table cellspacing="2" cellpadding="2" border="1">
 <tr>
   <td align="right">Name</td>
   <td><input type="text" name="Name" /></td>
 </tr>
 <tr>
   <td align="right">EMail</td>
   <td><input type="text" name="EMail" /></td>
 </tr>
 <tr>
   <td align="right">Zip Code</td>
   <td><input type="text" name="Zip" /></td>
 </tr>
 <tr>
 <td align="right">Country</td>
 <td>
 <select name="Country">
   <option value="-1" selected>[choose yours]</option>
   <option value="1">USA</option>
   <option value="2">UK</option>
   <option value="3">INDIA</option>
 </select>
 </td>
 </tr>
 <tr>
   <td align="right"></td>
   <td><input type="submit" value="Submit" /></td>
 </tr>
 </table>
 </form>
 </body>
 </html>

Basic Form Validation:

First we will show how to do a basic form validation. In the above form we are calling validate() function to validate data when onsubmit event is occurring. Following is the implementation of this validate() function:
<script type="text/javascript">
<!--
// Form validation code will come here.
function validate()
{
 
   if( document.myForm.Name.value == "" )
   {
     alert( "Please provide your name!" );
     document.myForm.Name.focus() ;
     return false;
   }
   if( document.myForm.EMail.value == "" )
   {
     alert( "Please provide your Email!" );
     document.myForm.EMail.focus() ;
     return false;
   }
   if( document.myForm.Zip.value == "" ||
           isNaN( document.myForm.Zip.value ) ||
           document.myForm.Zip.value.length != 5 )
   {
     alert( "Please provide a zip in the format #####." );
     document.myForm.Zip.focus() ;
     return false;
   }
   if( document.myForm.Country.value == "-1" )
   {
     alert( "Please provide your country!" );
     return false;
   }
   return( true );
}
//-->
</script>

Data Format Validation:

Now we will see how we can validate our entered form data before submitting it to the web server.
This example shows how to validate an entered email address which means email address must contain at least an @ sign and a dot (.). Also, the @ must not be the first character of the email address, and the last dot must at least be one character after the @ sign:
<script type="text/javascript">
<!--
function validateEmail()
{
 
   var emailID = document.myForm.EMail.value;
   atpos = emailID.indexOf("@");
   dotpos = emailID.lastIndexOf(".");
   if (atpos < 1 || ( dotpos - atpos < 2 )) 
   {
       alert("Please enter correct email ID")
       document.myForm.EMail.focus() ;
       return false;
   }
   return( true );
}
//-->
</script>

JavaScript - Errors & Exceptions Handling

There are three types of errors in programming: (a) Syntax Errors and (b) Runtime Errors (c) Logical Errors:

Syntax errors:

Syntax errors, also called parsing errors, occur at compile time for traditional programming languages and at interpret time for JavaScript.
For example, the following line causes a syntax error because it is missing a closing parenthesis:
<script type="text/javascript">
<!--
window.print(;
//-->
</script>
When a syntax error occurs in JavaScript, only the code contained within the same thread as the syntax error is affected and code in other threads gets executed assuming nothing in them depends on the code containing the error.

Runtime errors:

Runtime errors, also called exceptions, occur during execution (after compilation/interpretation).
For example, the following line causes a run time error because here syntax is correct but at run time it is trying to call a non existed method:
<script type="text/javascript">
<!--
window.printme();
//-->
</script>
Exceptions also affect the thread in which they occur, allowing other JavaScript threads to continue normal execution.

Logical errors:

Logic errors can be the most difficult type of errors to track down. These errors are not the result of a syntax or runtime error. Instead, they occur when you make a mistake in the logic that drives your script and you do not get the result you expected.
You can not catch those errors, because it depends on your business requirement what type of logic you want to put in your program.

The try...catch...finally Statement:

The latest versions of JavaScript added exception handling capabilities. JavaScript implements the try...catch...finally construct as well as the throw operator to handle exceptions.
You can catch programmer-generated and runtime exceptions, but you cannot catch JavaScript syntax errors.
Here is the try...catch...finally block syntax:
<script type="text/javascript">
<!--
try {
    // Code to run
    [break;]
} catch ( e ) {
    // Code to run if an exception occurs
    [break;]
}[ finally {
    // Code that is always executed regardless of 
    // an exception occurring
}]
//-->
</script>
The try block must be followed by either exactly one catch block or one finally block (or one of both). When an exception occurs in the try block, the exception is placed in e and the catch block is executed. The optional finally block executes unconditionally after try/catch.

Examples:

Here is one example where we are trying to call a non existing function this is causing an exception raise. Let us see how it behaves without with try...catch:
<html>
<head>
<script type="text/javascript">
<!--
function myFunc()
{
   var a = 100;

   alert("Value of variable a is : " + a );
 
}
//-->
</script>
</head>
<body>
<p>Click the following to see the result:</p>
<form>
<input type="button" value="Click Me" onclick="myFunc();" />
</form>
</body>
</html>

Now let us try to catch this exception using try...catch and display a user friendly message. You can also suppress this message, if you want to hide this error from a user.
<html>
<head>
<script type="text/javascript">
<!--
function myFunc()
{
   var a = 100;
   
   try {
      alert("Value of variable a is : " + a );
   } catch ( e ) {
      alert("Error: " + e.description );
   }
}
//-->
</script>
</head>
<body>
<p>Click the following to see the result:</p>
<form>
<input type="button" value="Click Me" onclick="myFunc();" />
</form>
</body>
</html>

You can use finally block which will always execute unconditionally after try/catch. Here is an example:
<html>
<head>
<script type="text/javascript">
<!--
function myFunc()
{
   var a = 100;
   
   try {
      alert("Value of variable a is : " + a );
   }catch ( e ) {
      alert("Error: " + e.description );
   }finally {
      alert("Finally block will always execute!" );
   }
}
//-->
</script>
</head>
<body>
<p>Click the following to see the result:</p>
<form>
<input type="button" value="Click Me" onclick="myFunc();" />
</form>
</body>
</html>

The throw Statement:

You can use throw statement to raise your built-in exceptions or your customized exceptions. Later these exceptions can be captured and you can take an appropriate action.
Following is the example showing usage of throw statement.
<html>
<head>
<script type="text/javascript">
<!--
function myFunc()
{
   var a = 100;
   var b = 0;
   
   try{
      if ( b == 0 ){
         throw( "Divide by zero error." ); 
      }else{
         var c = a / b;
      }
   }catch ( e ) {
      alert("Error: " + e );
   }
}
//-->
</script>
</head>
<body>
<p>Click the following to see the result:</p>
<form>
<input type="button" value="Click Me" onclick="myFunc();" />
</form>
</body>
</html>

You can raise an exception in one function using a string, integer, Boolean or an object and then you can capture that exception either in the same function as we did above, or in other function using try...catch block.

The onerror() Method

The onerror event handler was the first feature to facilitate error handling for JavaScript. The error event is fired on the window object whenever an exception occurs on the page. Example:
<html>
<head>
<script type="text/javascript">
<!--
window.onerror = function () {
   alert("An error occurred.");
}
//-->
</script>
</head>
<body>
<p>Click the following to see the result:</p>
<form>
<input type="button" value="Click Me" onclick="myFunc();" />
</form>
</body>
</html>

The onerror event handler provides three pieces of information to identify the exact nature of the error:
  • Error message . The same message that the browser would display for the given error
  • URL . The file in which the error occurred
  • Line number . The line number in the given URL that caused the error
Here is the example to show how to extract this information
<html>
<head>
<script type="text/javascript">
<!--
window.onerror = function (msg, url, line) {
   alert("Message : " + msg );
   alert("url : " + url );
   alert("Line number : " + line );
}
//-->
</script>
</head>
<body>
<p>Click the following to see the result:</p>
<form>
<input type="button" value="Click Me" onclick="myFunc();" />
</form>
</body>
</html>
You can display extracted information in whatever way you think it is better.

You can use onerror method to show an error message in case there is any problem in loading an image as follows:
<img src="myimage.gif"
    onerror="alert('An error occurred loading the image.')" />
You can use onerror with many HTML tags to display appropriate messages in case of errors.